Thursday, April 5, 2012

Guest post - Mesothelioma Journey

I wanted to apologize for the lack of posts this last week. I've reached 35 weeks in my pregnancy and Hannah has dropped (twice!) so the pain is pretty ridiculous and I haven't been up to doing much besides wallowing in misery, haha! I have a few posts I wanted to get done but in the meantime, I have something a little more important - a guest post by Heather at Heather Von St James - Mesothelioma Survivor Blog (there is also a button on the side of my blog for future reference.) I just want to thank her for sharing her story with myself and my readers and say that I'm glad she's been able to make such a recovery!


Mesothelioma Journey

In November of 2005, I was diagnosed with malignant pleural mesothelioma. The deadly diagnosis was the realization of my greatest fear, especially as my only daughter, Lily, was just 3 1/2 months old at the time. However, as a result of my diagnosis, I found I was stronger than I ever thought I could be.

My initial research into malignant pleural mesothelioma led me to the grim statistics: only 2% survived more than five years after diagnosis. I decided then and there that I would be in that 2%. I was going to survive this cancer no matter what it took.

For the next year, I spent every ounce of energy I had fighting this disease. During that time, I was referred to Dr. David Sugarbaker, one of the world’s leading mesothelioma doctors, at Brigham and Women’s Hospital in Boston. Dr. Sugarbaker found the tumor in my left lung and determined it needed to be removed. Lily was now 6 months old and 1900 miles away, with my parents, as I fought for my life in that operation.

I spent the next few months raising Lily while at the same time undergoing chemo and radiation treatments. I would never have been able to take care of Lily without the support of my wonderful family and devoted friends. Although I spent the first year of her life sick, Lily was oblivious. Lily’s first birthday was spent, not only celebrating for her, but also for the nearing end of my mesothelioma treatment. That came a few months later, just shy of the anniversary of my mesothelioma diagnosis.

That terrible year of battling mesothelioma has taught me not to take anything for granted. I take great joy in the little things in life: Lily’s laughter, rainbows, and even a puppy’s breath on my face. Everything reminds me that life is there to live.

Because of my battle with mesothelioma, I’ve met so many wonderful people. They are people who battle mesothelioma every day, those who care for their loved ones during the battle, and especially those who lost the battle for one reason or another. Those battling mesothelioma amaze me to this day with their incredible tenacity for life. For all of them, I work to raise awareness for mesothelioma. Mesothelioma is more than just a commercial; it’s a real disease with real people struggling to stay alive.

As I continue to live my life with my daughter, I always find something to be grateful for. Even on bad days, there is something to be grateful for, even if it’s just being alive.
Pin It

Wednesday, March 28, 2012

Cheesy Hashbrowns & Pork Chops


What you need (Cheesy Hashbrown Casserole):
- 1 lb (one package) hash browns, defrosted 
- 1/2 c. melted butter
- 1 tsp. salt
- 1/4 tsp. pepper 
- 1 can cream of chicken soup 
- 1 c. milk 
- 1 c. sour cream 
- 2 c. shredded cheddar cheese (I just use an entire package of it.)

What you do (Cheesy Hashbrown Casserole):
- Preheat oven to 350*.
- Mix ingredients together in a large bowl.
- Place into a 9"x13" glass baking dish and bake for 45 minutes.

What you need (Ranch Italian Oven Fried Pork Chops):
- Ranch dressing
- 2 c. Italian bread crumbs
- 1 packet of Italian dressing mix
- 2 tbs parmesan cheese
- 1 tbs garlic powder
- Pork chops (however many you want to make is up to you.)

What you do (Ranch Italian Oven Fried Pork Chops):
- Preheat oven to 350*.
- Mix bread crumbs, Italian dressing mix, parmesan cheese & garlic powder in a large bowl. Pour some ranch dressing onto a plate.
- Coat pork chops in ranch dressing and coat with the dry mix (in the bowl.)
- Place on tin foil-lined, cooking spray coated baking pan. Bake for 45 minutes.


Please ignore the insane-looking cream corn in the picture of the finished dinner. Apparently it's all we had and split an entire can between the two of us. I figured I'd switch it up and make pork chops instead of chicken like I usually do. These pork chops weren't that bad and were real easy to make. We had a lot of crumbs/coating left over but only used 3 pork chops so you may have to alter the crumb mix for your family.

The cheesy hashbrowns are something I make every now and again and are my absolute favorite. They make great leftovers (and I hate eating leftovers) and taste great cold as well. My boyfriend had never had it until I started making them and it's one of his favorites. Heck, everyone I know who has had them is in love with them.

Pin It

No-heat curls for short hair.

Last fall, I made the terrible decision to cut ALL my hair off. It was past my shoulder blades and I decided to get a cute little bob and cute it was! I received a million compliments on it, I didn't miss my longer/wavy hair at all! About a month later, I got real gutsy and decided to get an even short pixie cut. I received a million compliments on that as well but hated it and have spent every minute since regretting that decision. Where's my long and wavy hair now?!? It's at that very awkward, in-between length where I can't quite put it up yet but it doesn't look that great down and natural.

I decided it was finally long enough to attempt to curl and tried various no-heat curling options found around online. None of them worked that well given how short my hair still is and I just found myself fed up and disappointed, regretting my haircut once again. So I decided to give something a try. It's not the quickest of methods but it was easy and worked pretty well with how short my hair is.

All you need is a TON of bobby pins, damp hair and a good night's sleep. Hairspray and mousse are optional but I recommend them both.


1. Pantene Pro-V Flawless Curls (extra hold) Mousse (optional.)

2. A TON OF BOBBY PINS.

3. I do this at night, after my shower and after my hair has had a little bit of time to air dry. I put a little bit of the mousse in my hair hoping it'll help the curls/waves hold. It seems to do the trick. I also take whatever I want to be my "bangs" (it varies each day and depending on whatever I'm doing to my hair) and pin them back and out of the way. I don't curl those.

4. Take a section of hair and twist, twist, twist. The amount of hair per section depends on your hair thickness & texture. It also depends on how coiled or loose you want the curls/waves to be. I don't grab a lot of hair as I want it to be pretty curly as opposed to looser waves. It's all trial-and-error really.

5. Once you twist the chunk of hair, twist it around itself to form a little twisty bun against your head. Secure with a bobby pin (or two if need be.)

6. Repeat the previous two steps until you've got an entire head full of little twisty buns. Does anyone else immediately think of Gwen Stefani (of No Doubt) from way back in the day? I hope I'm not that old that nobody else knows what I'm talking about. Anyway, do this all over and if you're ridiculous like myself... spray some hairspray over it all to "ensure" the hold. It probably doesn't make any difference and you can likely skip the hair spray entirely but I do it just to be safe. Leave it in overnight while you sleep.

7. In the morning, start removing all the bobby pins.

8. If you're anything like me, you'll have a big ol' heart attack at first sight of your hair. I nearly cried buckets (probably mostly due to pregnancy hormones) because the curls were so short and against my head. I looked ridiculous but I assure you, it's such an easy fix! I use a wide-toothed comb, run it under water and run it through my hair. If that doesn't seem to make a difference, I just dampen my hair otherwise (spray bottle, run small handfuls of water through my hair) and comb it out. It starts to look more normal after that step alone. Then I take the Pantene Pro-V mousse (in #1) and run that through my hair, scrunching it up. Some of the curls like to stick out and up in all strange directions but I just twist them in the direction they naturally want to go until they sit nicely. You just play with it to get the desired amount of waves/curls and volume that you want. I finish it off with some hairspray to help hold it.

9. Go about your day :) I'm sure it depends on your hair but these curls will stay in for me for several days if I let them/don't wash my hair.

Have any questions? Any tips or tricks you'd like to add? Don't hesitate to comment and let me know!

Pin It 

Friday, March 23, 2012

My new Etsy shop!

I have a few posts lined up for y'all to read but forgive me for not having time to get them posted. In the meantime, I wanted to shamelessly plug but brand new Etsy shop. Several friends insisted I get one going since I like to make digital prints/art/work/whatever you want to call it so I finally bit the bullet and got one going. It only has a few listings right now but after the weekend, that will change a bit.

Also, once things get a little more settled around here I plan to list some homemade jewelry in the shop as well.


If you would be so kind as to check it out and spread the word, it would be much appreciated. Thank you! Hope you all have a wonderful weekend. Mine will be spent working on another maternity photo shoot and rainbow pinwheel sugar cookies with my six-year-old (yes, I will share pictures & a how-to!)

My Etsy shop - String & Ink.

Pin It

Thursday, March 22, 2012

32 weeks, maternity shoot.

One of the perks of having a photographer for a mom is that I didn't have to spend a dime on my maternity photo shoot. One of the downsides to have a 6-year-old is that she doesn't like to cooperate in photo shoots. It was a hectic day to say the least. The weather was beautiful but we had several days of rain over the last week making for a very muddy ground meaning we were restricted to where we could take pictures. My favorite setting (by the barn) was so muddy that we stayed there for maybe 10 minutes before calling it quits. My daughter didn't want to participate in any of the poses we asked of her and then when we asked what she did want to do, she would shrug her shoulders. Needless to say, it wasn't the best photo shoot but everyone seems to love the pictures so I thought I'd share them here for anyone who may be reading this.

We're going to give the photo shoot another attempt sometime before the baby's born (we're due 7 weeks from today so fingers crossed we can fit one in!) We're hoping for dry ground and involving my daughter earlier in the day when she's in a better mood (we couldn't include her in this last shoot until after school.) Well without further ado, here are a few shots. They're saved off of Facebook so the quality of the image isn't that great.


By the end of the day (pictures taken in the blue dress by the white fence) I was mentally and physically exhausted and ready to call it quits. I was over there working with my Mom from 10am until 6:30 in the evening. If anyone has tips on making a stubborn 6-year-old cooperate in photo shoots, we'd LOVE to hear them!

Pin It

Wednesday, March 21, 2012

Crockpot Chicken & Dumplings

I'm a big fan of comfort foods and I'm an even bigger fan of all things "chicken & dumpling." I don't know why, I always have been. We've been experiencing record-high temperatures the last few days so I know most people want to stay away from comfort foods but this just recipe tastes so good, I had to make it anyway.


What you need:
- 3-4 boneless, skinless chicken breasts (thawed)
- 2 tbs butter
- 2 (10 oz) cans of condensed cream of chicken soup
- 1 (14 oz) can of chicken broth
- 1 medium onion, diced (or 1 tbs onion powder, which I used instead)
- 4 large flaky fridge biscuits (half a can, we used Grands** brand and used 5 instead of 4, just made the rest in the oven as normal)
** I do want to point out that most times Grands brand flaky biscuits come with a coupon so that you can save $0.30 on 3 cans, if you want to save a little bit.
 
What you do:
- Place thawed chicken in the crock pot. Add the butter, soup, broth and onions/onion powder. Cook on high 4-6 hours or on low for 8 hours. No stirring!
- Cut each uncooked biscuit into small pieces and stir into the mix. Continue to cook on high for 30 minutes.
- Remove chicken and shred with a fork. Return it to the crock pot, mix & serve :)


I can't express just how delicious we think this recipe is. I could eat it every single day to be honest. I love my Crockpot. The chicken always turns out so moist and shreds very easily. That being said, I will probably share a ton of various Crockpot recipes as I try them out. It's my first time owning one and I think it could easily replace my oven if I let it!
Pin It

Monday, March 19, 2012

Cheesy Bacon Oven Chips with Chipotle Ranch Sauce!!


What you need (for the oven chips):
- 1 large (or 2 medium) russet potatoes, cut into 1/8” rounds.
- Cooking Spray
- Shredded cheddar or colby jack cheese
- Salt & Pepper to taste
- Crumbled bacon (I used Bacon Bits)

What you need (for the chipotle ranch sauce):
- 1 tbs ranch dressing
- 3 tbs sour cream
- 1/4 tsp chipotle chili powder
- 1/8 tsp cayenne
- 1/8 tsp salt
- 1/8 tsp garlic powder

What you do (for the oven chips):
- Preheat oven to 375 degrees.
- Bring sliced potatoes to a boil in cold, salted water. Boil for 5 minutes.
- Carefully drain and transfer slices to a paper-towel lined countertop or cutting board.  Pat to dry. Be careful as they like to mush and crumble.
- Grease a baking sheet with cooking spray and lay out potato slices.
- Spray lightly with additional cooking spray, then sprinkle with salt & pepper to taste.  Sprinkle evenly with shredded cheese & bacon.
- Bake 12-14 minutes in preheated oven until cheese is melted & bubbly. Serve with chipotle ranch sauce.

What you do (for the chipotle ranch sauce):
- Place all ingredients in a small bowl and stir to combine.  Refrigerate any leftovers.

I’ve been wanting to try this forever now so I sent Tyler to pick up the chipotle chili powder and went to work. This best serves 2 people but can easily but altered for larger parties. You can peel your potatoes or not (I peeled mine because I’m not a fan of the skin, sue me.) It was absolutely, without a doubt, freaking delicious and is something I’ll make again and again and again if I can. We have all this stuff in the house on a regular basis anyway and did a good job of filling us both up without making a ton of food. So glad I decided to give this a try. I will say that the ranch sauce had a serious kick to it (but we loved it all the same) so if really hot isn't your thing, you may want to lessen the chipotle chili powder or the cayenne.

Pin It

Sunday, March 18, 2012

Tissue paper pom-poms!


Since I'm far from crafty, I saw this idea on Pinterest and knew it was exactly what I wanted to do in the nursery. It was cheaper and looks far cuter than getting some sort of mobile to hang off the side of the crib and can still be used to decorate the room as she grows up.

I didn't anticipate creating a blog where I'd share my DIY projects or anything like that so I don't have step-by-step pictures to share. However, it's pretty easy and I followed a tutorial on Martha Stewart's website and you can access that same tutorial here.

I just bought my tissue paper from Target (1 pack of the larger dark pink and 1 pack each of the smaller white and two different lighter pinks which are only $0.99 each), used monofilament to hang them from the ceiling (we found that at Drug Mart) and bought the pre-made paper lanterns from our local craft store for $2.00 each.

Has anyone else used this tutorial/design anywhere in their home? For a birthday party? I'd love to see what others have done with it! 

This is extremely off-topic but if anyone out there is more experienced in blog layouts than I am (as you can see, I'm not experienced at all!) I could use a better/new layout. If you can help me out with that, I would love you forever. 

Pin It

Friday, March 16, 2012

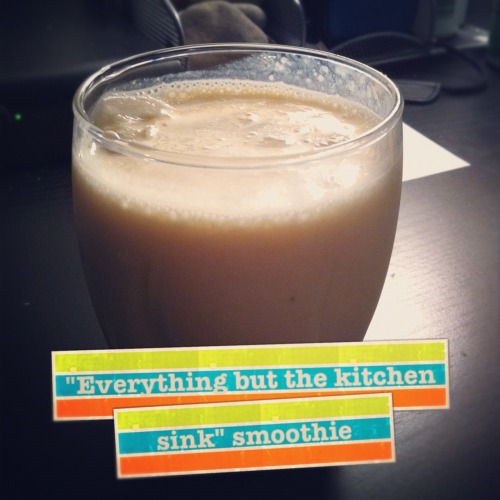
"Everything but the kitchen sink" smoothie.

What you need:
- 1 Cutie
- 1 banana
- Half of a pink lady apple
- Brisk Pink Lemonade + White Tea
- Vanilla ice cream
- 5 ice cubes

What you do:
- Mix it all together and blend until smooth.

We just threw some random stuff we had together and it came out great. It reminds me of an orange creamsicle if you know what those are. We didn’t use any specific amounts of ice cream, just put in several scoops until the consistency was to our liking. With the Brisk, I just put in half a glass as that’s what I had left from what I was drinking haha. But we’re both pretty impressed with the way it turned out seeing as we don’t know what we’re doing in the kitchen and we just started throwing random things in there haha. We were going to add strawberries but they went bad :/ Whoops.

Pin It

Hello & welcome to my blog.

I just wanted to start out by saying I'm not a blogger. I've started about a dozen blogs and abandoned them very quickly. I'm not quite sure why seeing as I'm active on other journaling websites and various social networks but an actual blog? I can't stick with it. This is my attempt to change that. This is my attempt to break outta that shell I've been living in. I think the biggest reason is because I feel like I don't have much to say - at least nothing the general public is interested in reading. However, you don't necessarily blog for everyone else. You do it for yourself, as an outlet and that's what I'm going to strive to do with this.

A little bit about me... in the event someone's actually reading this.

My name's Amanda and I'm going on 26 years young, just two months from today (I just now realized that, how exciting and scary!) I have a beautiful 6 year old little girl who calls me mama and I'm expecting my second daughter on May 10th (yes, right before my birthday!) I'm taken by a wonderful fella and we live with our two-year-old cat that we've named Nona (short for no-name, because we couldn't decide on a name for her.) We live in Northeast Ohio, just outside of Cleveland and I'm an avid Cleveland sports fan - Go Indians & Go Browns! I'll try not to bore y'all with sports-related posts. I wish I could say I've attempted and achieved a college degree but it hasn't been in the cards for me just yet. When the time comes and I can return to school, I'm planning to go for nursing or something else medical related. In the meantime, I'm employed full-time at my local Target store although I've been on leave due to my pregnancy for awhile now.

The title of my blog should say it all - The Faux Housewife. I'm no housewife but I like to pretend to be, haha. I love to cook - cooking doesn't love me. I love to craft - crafts don't love me. But I've been trying to keep it all up anyway because it's what I enjoy doing. I've never been good at cooking but recently my boyfriend and I moved into a new apartment together and I've become determined (mostly in thanks to Pinterest) to improve on all sorts of domesticated skills - especially cooking. We invested in a crock pot and I've fallen in love with it. It makes me look like I know what I'm doing without actually having to do anything! So my intention with this blog is to share recipes I've tried out or even created myself, share DIY projects I've tackled (failed attempts and successes!) and everything in between dealing with my girls, my relationship and my life.

Hopefully I don't bore y'all too much. And hopefully I manage to keep this little beauty active!
Thanks for taking the time to check it out :)

Pin It